
How to Run vLLM on Apple M4 Mac Mini
vLLM is a powerful inference engine for LLMs. It’s designed to serve models faster and more efficiently.

That’s exactly what I asked last week during the vLLM meetup at Red Hat.
Well, vLLM is designed with scalability in mind, for large-scale LLM inference and serving. It’s not really built for local use.
But my question was:
If it can’t even run on my machine, how will it work in production?
I got curious and started experimenting on my M4 Mac Mini, which has a 10-core GPU and 21 GB of unified memory.
Unfortunately, vLLM doesn’t support Apple Silicon GPUs at the moment.
But fortunately, there’s experimental support for Apple Silicon CPUs.
Right now, you need to build vLLM from source to run it natively on macOS.
So I did exactly that, and here’s what I found, even when running vLLM on just the CPU:
vLLM is a super fast and memory-efficient tool to serve large language models like LLaMA, OPT, etc. Good news, vLLM now has experimental support for macOS with Apple silicon (like the M4 chip)!
In this guide, I’ll walk you through how to install and run vLLM natively on your M4 Mac Mini.
No GPU required, just your CPU is enough!
Let’s get started.

What is vLLM?
vLLM is a powerful inference engine for LLMs (Large Language Models). It’s designed to serve models faster and more efficiently.
Benefits of vLLM:
High throughput with continuous batching
Efficient memory usage for long conversations (via PagedAttention)
Compatible with OpenAI APIs, just plug it into your existing tools
Supports distributed inference for large-scale deployments (Linux only)
Prerequisites
On macOS, vLLM will automatically run on CPU (Apple silicon support is still experimental).
vLLM currently supports FP32 and FP16 data types on CPU.
Make sure you're using Python between 3.9 and 3.12.
Your Mac might have Python 3.13 installed, but vLLM won’t work with it.
Step-by-Step Installation
1. Install Anaconda
We’ll use Anaconda to manage Python environments easily.
brew install --cask anacondaInitialize Conda for your terminal:
/opt/homebrew/anaconda3/bin/conda init zshRestart your terminal.
2. Create a Python 3.12 Environment
Your Mac might have Python 3.13 installed, but vLLM won’t work with it because vLLM requires Python 3.12.
sudo conda create -n vllm-env python=3.12
conda activate vllm-env
3. Clone the vLLM Repo
There are no pre-built wheels or images for Mac device, so you must build vLLM from source.
git clone https://github.com/vllm-project/vllm.git
cd vllm
4. Install CPU Requirements
pip install -r requirements/cpu.txt
pip install -e .
Check vLLM version:
vllm --versionYou should see something like:
Automatically detected platform: cpu
0.10.1.dev118+g18cc33dd6
Setting Up a Chat Template
Starting from transformers version 4.44, if the model you're using doesn’t include a built-in chat template, you need to supply one.
Here’s a simple Jinja2 template for OPT models. Save it as opt_chat_template.jinja.
{{- bos_token if bos_token is defined }}
{%- for message in messages %}
{{- '\n' if not loop.first }}
{%- if message['role'] == 'user' -%}
User: {{ message['content'] }}
{%- elif message['role'] == 'assistant' -%}
Assistant: {{ message['content'] }}
{%- endif %}
{%- endfor %}
{{- eos_token if eos_token is defined }}
Serve Your Model
Before launching, set these environment variables:
export VLLM_CPU_KVCACHE_SPACE=10
export VLLM_CPU_OMP_THREADS_BIND=autoVLLM_CPU_KVCACHE_SPACE: Allocates memory to store the intermediate states (KV cache) during inference. A larger value (like 10 or 10 GB) gives more room for longer context or concurrent requests.
VLLM_CPU_OMP_THREADS_BIND: Controls how threads are assigned to CPU cores.
auto: Lets vLLM/OpenMP choose the best way to distribute threads across cores
Now start the server:
vllm serve facebook/opt-125m --dtype=bfloat16 --chat-template ./opt_chat_template.jinjaThe server will start and listen on:
http://localhost:8000/v1You can connect to it using any OpenAI-compatible tool (like OpenWebUI or curl).

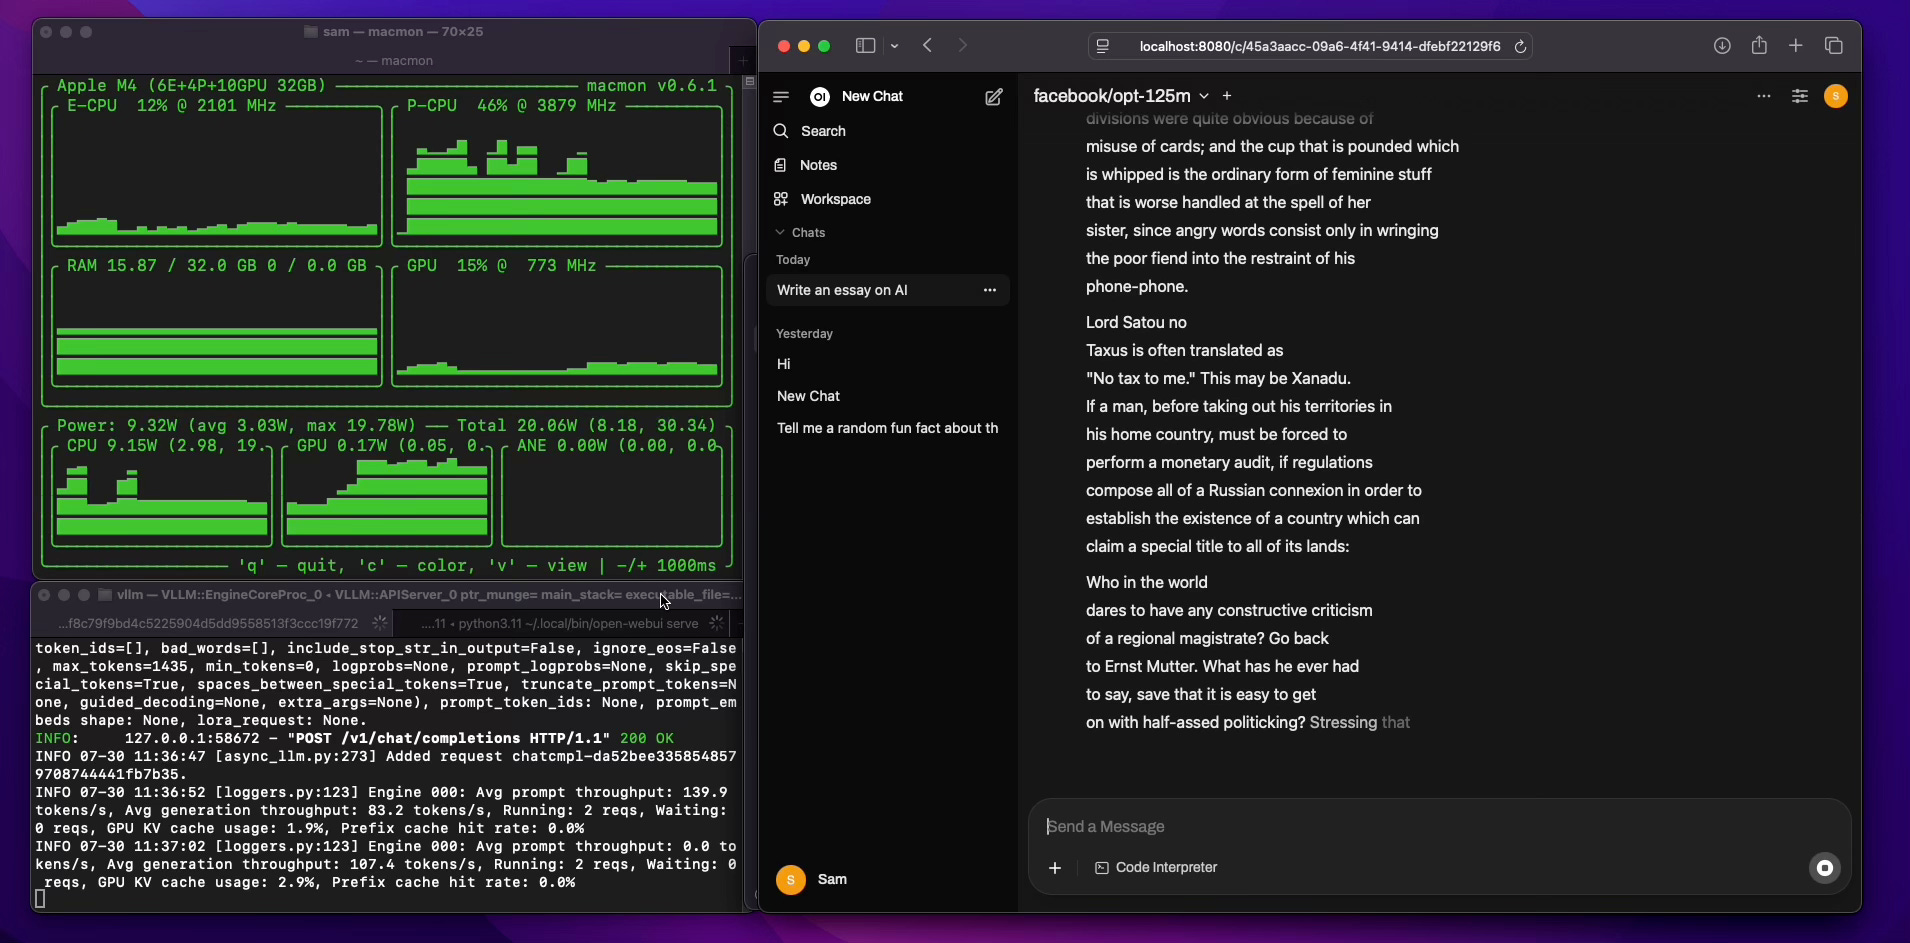
Performance on M4 Mac Mini
Max Performance Core (P-CPU) usage: ~82%
Prompt Throughput: ~140 tokens/sec
Generation Throughput: ~83 tokens/sec
KV Cache Usage: ~2.9%
Not bad for a fanless Mac Mini running on CPU only!
Final Thoughts
Even though vLLM on macOS is still in the early stages, it’s already fast and reliable enough for local testing, prototyping, and personal use. If you're into LLMs and want something OpenAI-compatible that runs locally without a GPU, this is a great option.
Source: LinkedIn Post